This introductory article aims to illustrate the basic functionalities of the Sonic Pi application, a software included in Raspberry’s Raspbian distribution that allows you to compose and execute music in a programmatic way, that is through the drafting of a code. In this post you will see a series of examples and how to perform simple melodies, edit sounds and add effects. At the end of the reading, however, you will move within the program with familiarity, carrying out your musical projects in full autonomy.
Sonic Pi
Sonic Pi is not a simple application but a truly open-source programming environment. The peculiarity of this application is that you can work with the music in a programmatic way, that is, this softwarea is designed to create new sounds and melodies programming code. Sonic Pi was developed by Dr Sam Aaron a researcher who works at the University of Cambridge and has been incorporated into the official Raspbian distribution, the operating system for all Raspberry Pi boards.
Since Sonic Pi is already included in the Raspbian image, in theory you should not need to install it. However, if this is not the case, or if you want to try it on another system, you can download the Sonic Pi software from the official site’s home home page.

On the home page, look for the download section below and then press the button. The download of the Debian package for installation will start automatically. Then once it has been downloaded, type the following commands
sudo dpkg -i sonic-pi_1_3.0.1-armhf.deb
sudo apt-get install -f
Getting started with Sonic Pi
Open the Sonic Pi app by clicking on the icon on the desktop or in the main application menu.
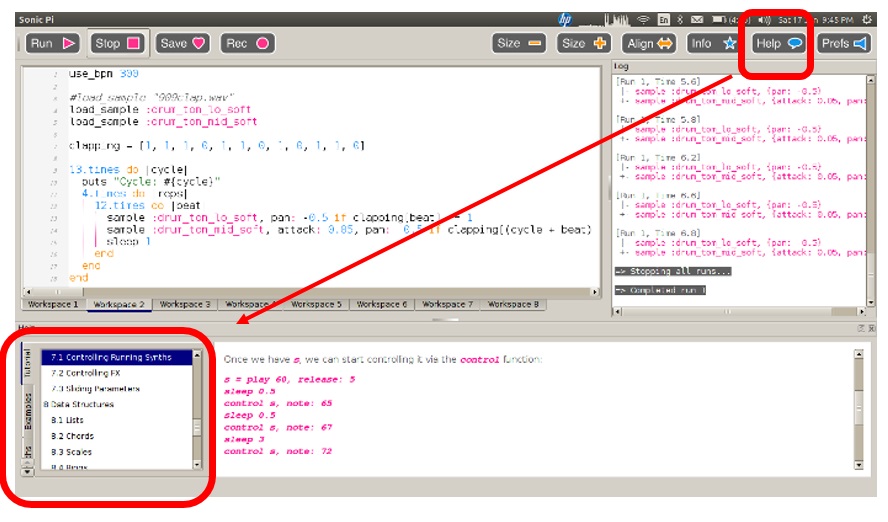
As soon as the program is loaded, you will see a window appear. The graphic interface of Sonic Pi is divided into three main sections. The largest on the left is the Programming Panel and is where you can enter the code. Then there is an output panel that shows current information about the program you are running. And finally there is the third panel that will open only by pressing the help button at the top of the window, this panel contains all the documentation.

Select Buffer 1 and type
play 60
Then press the Play button.
Raspberry will sound a note. Remember to insert headphones or connect Raspberry to a box …. otherwise you will not hear anything! 😉
To play a note, use the play command. Now enter a longer sequence of commands
  play 60
  play 67
  play 69
This time Raspberry will emit three different notes in sequence, the notes correspond to the numbers we have entered. But the notes are performed too quickly to be appreciated individually. So we can add a pause after each note. We can do it with the sleep command.
  play 60
  sleep 1
  play 67
  sleep 1
  play 69
The parameter passed after sleep corresponds to the seconds of duration of the pause. Now that we have understood everything we can use the commands we know to insert a melody …
Select Buffer 2 and then enter the following commands.
 play 60
 sleep 0.5
 play 62
 sleep 0.5
 play 64
 sleep 0.5
 play 60
 sleep 0.5
But consider the case in which you want to repeat this sequence of notes twice? Instead of writing the sequence again (or copying and pasting it below) it is better to use a loop. This is possible via the times command. This command has a particular syntax
2.times do
  play 60
  sleep 0.5
  play 62
  sleep 0.5
  play 64
  sleep 0.5
  play 60
  sleep 0.5
end
As you can see, the number of times a cycle must be repeated is numerically reported before the command separated by a period. The part of code to be repeated is enclosed between the keys do and end and the internal block is indented. This makes reading code easier.
Being able to repeat parts of a melody in this way allows us to save the writing of long sequences of commands and is therefore a very convenient form to use in our codes. If you want to repeat a sequence indefinitely, use the loop command instead of times.
loop do
  play 60
  sleep 0.5
  play 62
  sleep 0.5
  play 64
  sleep 0.5
  play 60
  sleep 0.5
end
MIDI note number
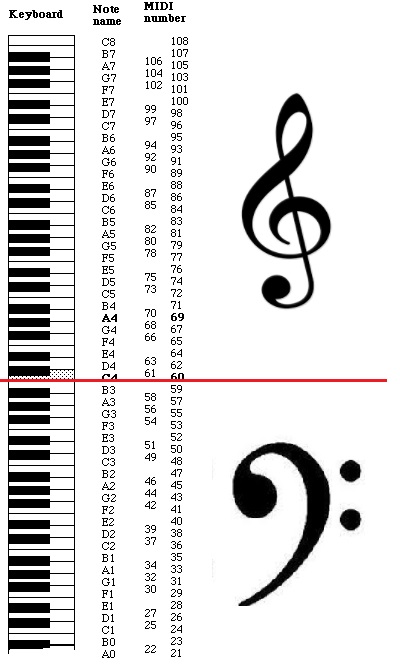
You have seen in the previous examples that each note corresponds to a number. This number is actually the MIDI note number, each of which corresponds to a key on piano.

So seeing the figure above, you can see that the notes of the previous melody were
C D E C
or
DO RE MI DO
But Sonic Pi does not only accept MIDI numbers as input values for the play command. In fact, if you open a new buffer as Buffer 3 and enter the following commands
  play :c4
  sleep 0.5
  play :d4
  sleep 0.5
  play :e4
  sleep 0.5
  play :c4
  sleep 0.5
pressing play will get the same previous melody. This time the musical notes were inserted instead of the numbers.
Playing chords
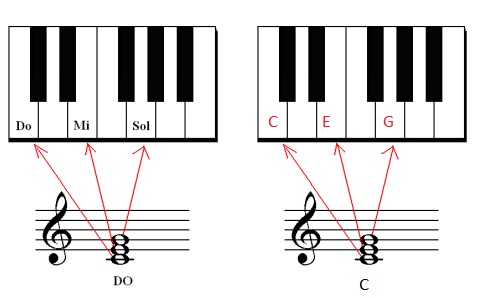
But the melody is not just simple notes, but sometimes it is necessary to play whole chords (composed of three or more notes).
To execute chords we use the chord () function which, as arguments, accepts the chord to be executed and the scale.
play chord(:a3, :minor)

Modify sounds
Now that you’ve seen how to make simple melodies, it’s time to change the sound. The default sound used by Sonic is called beep. To use a different sound it is necessary to add a command line at the beginning of our code using the use_synth command followed by the name of the sound to be set.
use_synth :fm
2.times do
  play 60
  sleep 0.5
  play 67
  sleep 0.5
end
where fm is the name of the chosen sound.
There are several sounds included within Sonic PI. To see the list of available sound names, click on the help icon at the top of the screen to open the documentation. Then select Synths from the table to see the list of sounds.

Using samples
With Sonic Pi you can not only create melodies by inserting a sequence of notes, but you can also use samples. Samples are pre-recorded sounds that can be inserted into the music. (Have you ever heard of sampled music and samplers?). This way you can get spectacular effects and sounds!
In order to use a sample, there is the sample command followed by the sample name to be used.
Try these commands.
2.times do
  sample :loop_amen
  sleep 1.753
end
As for the sounds there are many samples already included within Sonic Pi. To find the list of samples click on the help icon and select samples.
Play two melodies simultaneously
The music consists of several different tracks, each one following a specific sequence of notes. So let’s see how it is possible with Sonic Pi to play two melodies simultaneously.
Open a new buffer, for example Buffer 4. Then we enclose the sequence of notes from exegurs simultaneously within the in_thread do and end commands.
 in_thread do
   loop do
     sample :loop_amen
     sleep 1.753
   end
 end
The first thread will play the melody of the music, while for the base, write:
 in_thread do
   16.times do
     play 75
     sleep 1.753
     play 74
     sleep 0.25
   end
 end
Clicking on Play button, you will hear the two melodies played simultaneously.
Change the code while Sonic Pi plays
Sonic Pi also offers the possibility to change the code in real time, let’s see with an example.
Open a new buffer, for example Buffer 5. Type the following code
  define :play_my_synth do
    use_synth :prophet
          play 50, attack: 0.2, release: 1.3
    sleep 0.5
  end

  loop do
    play_my_synth
  end
Press play to play the notes.
While Sonic Pi is running, comment out the last three lines by adding the # symbol at the beginning of each one.
# loop do
  #   play_my_synth
  # end
As you can see the melody that was put in infinite loop will stop, taking into account in real time the changes made to the code.
This opens up new perspectives if we think about the fact that we can add and remove notes in real time, thus adjusting the melody as it is performed.

Sound effects
All synthesizers have the ability to modify the basic sound by adding effects. Even Sonic Pi lets you add classic effects like reverb, echo and distortion.
To add the effect to a particular sample we must use the command with_fx followed by the name of the effect and enclose the sample within do and end. For example.
  with_fx :reverb do
    sample :guit_e_fifths
  end
Multiple effects can be used at the same time:
  with_fx :reverb do
    with_fx :distortion do
      sample :guit_e_fifths
    end
  end
Add parameters to the notes
So far you have seen commands to perform melodies and control sounds in the basic mode. This was done for simplicity and for illustrative purposes. In reality each command accepts a series of parameters that enrich the behavior of each of them. For example, you can add parameters to the play command.
play 60, attack: 1, release: 3
With these parameters the mode of the issued note is different from the standard one. There are a further series of parameters that can be applied to the execution of a single note such as cutoff :, pan :, rate: e amp :.
However, I recommend going to look at the documentation by clicking on the Help icon.
Random music
In the topics included in this article, there is also the possibility to perform random music, ie melodies performed using random parameters that make the execution of a command different each time. This is thanks to the rrand (min, max) function that allows to generate random numbers between the min and max value passed as arguments of the function. This function can be inserted in any part of the code, either to execute random notes, or to execute certain notes with random parameters.
Try the following piece
  loop do
    play chord(:a3, :minor).choose, attack: 0, release: 0.3, cutoff: rrand(40, 120)
    sleep 0.2
  end
[:]
